Tuesday, May 4, 2010

Quilting designs

If you ever wondered where on earth all those graceful quilting designs come from on a quilt, several were designed by manual effort. Many others, however come from using a pattern. Before the days of patterns all the quilting designs originated in someone's mind as they saw in their mind's eye what they wished the end product to look like. With several designs crossing over several different squares it is easy to realize that it demands real talent to design your own quilt.

Patchwork quilts are possibly the most effortless designs to do because they consist of nothing except than a patchwork of distinct color materials, cut up into squares and sewn together in random order. Those patches that are made in a quilting design must be sewn back together in sequence for the material's patterns to match. Whether left to right or top to bottom, making a patterned match on each square with a square next to it requires planning and a lot of patience.

Your quilt size and the size of the squares, which will form the quilt will determine how complex the design of the quilt will be. While many decide on keeping their designs simple, others desire more intricate and complex designs. Using material that already has a premade design on it can make things a lot easier, but you still need to make each piece of similar size to make certain they fit together properly to form the designed size.

If you want to make your quilting designs reversible, you must realize that you will be spending an inordinate amount of time making it. Both sides must be finished, in regards to knots, and dependent upon your concept of reversible, may well require both sides made in mirror image before you sew all the layers together.

A sewing machine with a computerized guide can make quilting designs much easier to make. Many enable you to enter your design and let the machine do the work. The machine will then follow the pattern on the material you've put in the machine. For entire quilts where duplicated quilting designs are wanted this can make them easily and quickly.

Handmade card

Handmade graduation cards do not have to be decorated with the traditional graduation caps and tassels or rolled up scroll, they can be created with your special graduate in mind. Taking some time to make a custom homemade graduation card for your graduate will be a special and memorable gesture.

Here are some creative graduation greeting cards ideas that might help to spark an idea of your own:

* Did your graduate complete his or her studies in an interesting major? Can you incorporate some part of their chosen major into a handmade card? For instance, if they graduated with an English major, then maybe you can decorate the front of the card to resemble dictionary entries with words like congratulations, graduate, honor, and other uplifting terms. Or if they graduated with a degree in geography you can decorate the front of the card with a cool topography or antique map.

* What school did the graduate attend? If you are familiar with the school, maybe you can incorporate the school mascot or school colors into the card. Does the school have a neat slogan that you can borrow to use on the front of the card? Incorporating aspects of the school into the card will be a fun way to personalize your congratulations and if the graduate is preparing a scrapbook of their college years, then it would be easy to include the card to represent their alma mater.

* Does the graduate have grand plans for the near future? Will your graduate be traveling after graduation? Or maybe they are planning on moving or getting married? Consider incorporating an aspect of their near future into their graduation card. Let them know that you are proud of them and know that they have some exciting things lined up for their future.

* Did your graduate complete specialized schooling? Did he or she attend law school or medical school? Can you decorate the handmade graduation card to reflect their chosen specialty? How about including a judge's mallet or stethoscope on the front of the card? Little fun items to reflect their interests is a great way to make your handmade graduation card stand out.

Finding a fun way to congratulate your graduate can be a real exercise in creativity. If you are still stuck for ideas, try brainstorming answers to some of questions asked above to see if you can find a special angle with which to make your own creative handmade graduation card. Regardless of how you decide to create it, your graduate will appreciate the extra thought and effort you put into the handmade card.

Making greeting card

Greeting card can make any occasion all the more special whether it is a birthday, anniversary, a festival or just any other event. You can just send across a greeting card and be assured this will be a gesture which anyone will just love. Greeting card has the amazing capacity to say many

things without someone actually have to say the things verbally. You can give a greeting card to just about anybody starting from family, friends, relatives, colleagues and neighbors. You just have to identify that special occasion and simply send across a greeting card and you can make the other person feel special. On second thoughts, do you even need an occasion for this? Simply send a card across to your loved one and see their wonderful reaction of joy and delight.

Buying a greeting card to send to friends and family has become passé these days. All this is largely due to the increasingly large scale use of internet. Today E cards are the rage and you can find anywhere people sending out these greeting cards. There are several advantages of this and the foremost among them being that it is very simply to send to anyone in any corner of the world and at anytime. The cost is less and the options are varied. In fact statistics indicate that the sale of traditional greeting cards for all occasions has come down drastically due to the huge popularity if E cards. So if you are still having second thoughts shed this and send a greeting card to your loved one.

Have you ever though of sending across a customized greeting card? Well it is not that late you can still do that and that too with wonderful results. There are several sites on the web that provide one with the option of making customized pictures incorporating different pictures. So if you are an enthusiastic photographer and have a digital camera in hand, you can easily make customized greeting cards though these sites. If you have uploaded personal pictures, you can put that picture in your customized greeting card. Imagine the surprise and joy of your sister if you can send her a birthday card with an old picture of her during her schooldays. She will be thrilled and this will surely be her most treasured birthday gift ever.

Greeting cards that are sent across during festivals are very popular among the people. So all you need to do is find out sites that specialize in helping people like you and me, send out greeting cards to family and friends on all occasions and not just some festivals. You just need to select a card from the huge inventory of greeting cards that they have and if you are not satisfied with this, you have other options as well.

Handmade cards

When you consider ways of making handmade Christmas greeting cards you could effortlessly come up with many ideas. The crucial point lies in your collection. The quantity of several collections you have to fashion your beautiful card, directly stays in ratio to the best card you would be in possession of. The assortment of decorations one could gather to make a fine-looking and eye-catching Christmas card would be the focal point of card making. It is not just a month's labor; you have to be inventive enough to look for stuff around you right from day one. These collected works would someday prove to be useful. Before sitting out to make your card, wander around to look for materials that would make Christmas greeting card truly exceptional.

Tips for Your Handmade Christmas Cards

1. It is significant that the resources you bring together should be colorful enough. Consequently, whenever you come upon several colored sheets with various thickness and you find them of no use, take out a punching instrument and punch out small balls. The balls should be of varying sizes. Try to get a hold of them with the use of compass and scissors. These groups of balls could be glued at the borders of photographs, to make frames for any photo, to lay them as a bed for a new embedding craft.

2. Gather several different colored ribbons to create beautiful bows and glue them in your Christmas card wherever essential. It would be magnificent to tie a bow around your card to hand them exclusively as a gift to your loved-ones. These ribbons could also be placed parallel to give the impression of beautiful Christmas trees.

3. Punch out star figures and parallel strips of colored papers to attach stars and hint trees using parallel strips. It would be nice to use silver and gold colors for stars.

4. Put aside colored threads that lay unused. If the threads’ colors are, gold and silver gather them to make out your own picture. Give them a classic touch using these golden threads. You can also use the golden threads in letters printed on the card. Glue them consequently and place them tight in place.

Rubber stamp designs

When you want to make an "impression" there is no better way than with a rubber stamp. You can find a rubber stamp with a great design on it that expresses your personality, or order a custom rubber stamp with your name, address or company logo on it. Rubber stamps are great for business or pleasure; they are great for kids and for executives, depending on what they are used for. Rubber stamps come in a variety of styles and choosing one over another is going to depend on the use for the stamp. Three common types of rubber stamps are: standard rubber stamps, self-inking stamps and pre-inked stamps.

Traditional Rubber Stamps
Standard rubber stamps are a good value for the money and are good for ordinary use. They are usually designed with wooden bases and handles and rubber heads. You can order a custom rubber stamp with your own phrase or information on it; and it is common for standard rubber stamps to have stock phrases like “Approved,” “Draft” or “Paid” on them for business use. Standard rubber stamps are available with dies that are made out of, photo polymer, or traditional rubber. Photo polymer stamp dies do not perform well with industrial inks. Rubber is the best material for standard stamps - it is durable and flexible. You will need to purchase an ink pad to go along with a standard rubber stamp, and there are many colors of ink available. Traditional Rubber Stamps can be made in any size or shape.

Self Inking Rubber Stamps
With self-inking rubber stamps, you do not need a separate ink pad. A rubber die is mounted to a plate that strikes a built-in ink pad each time an impression is made. You don’t have to worry about the mess caused when you accidentally touch the ink and get it on your fingers as self inking stamps have the stamp and the ink pad self contained. They can make thousands of impressions before their internal ink pads need to be reinked. Self-inking stamps are popular for business purposes, mass mailings, or if you simply are tired of writing your address by hand on every letter you send. These are good for repetitive stamping tasks and are usually used for custom work like address stamps and endorsement stamps, or for general business uses.

Pre inked Rubber Stamps
A pre-inked stamp does not require a separate ink pad either since the ink resides within the stamp’s surface. The ink is transmitted to the paper’s surface through microscopic pores in the rubber which also prevent leakage. A pre-inked rubber stamp is refilled by placing more ink into its reservoir. Like self-inking stamps, pre-inked stamps are good to use when you have many impressions to make, such as mass mailings or if you want to have a stamp with your address or monogram on it.

Wood crafts

Country wood crafts have found a place in recent years in many homes that have very little otherwise in the way of country decor. Many different types of crafts have shown up in droves, from the simple things such as plaques and wicker baskets, to much more complex carvings and such. There is a beauty to country wood crafts which goes beyond their obvious qualities. Something in the way they are constructed makes a welcome plaque feel truly welcoming, or a handmade carving of a bear more than just shaped wood, but truly as majestic and powerful as the creature it depicts. While it is impossible to truly explain why this is the case, there can be no doubt that it is true.

If you want to bring a sense of welcome to your own home, there is nothing that does so quite as well as a welcoming plaque. It can carry nearly any message or image you desire, and is probably the simplest of all country wood crafts. However, despite being so simple, it can have a great deal of impact on your home, particularly if you choose a message that has a special meaning to you and your family.

Like all country wood crafts, the first thing you will need for your project is wood. The wood you use does not really matter all that much, apart from the size of the piece. It can be in any shape you want, although leaving it in the natural shape it is cut in will give your end result a little bit of an extra rustic feel. You can get this kind of wood from many craft supply stores, in a number of different varieties. Or, if you are so inclined, you could simply cut a piece of wood from a tree or a fairly thick branch to use for your project. Be sure the piece you cut is large enough to hold the message you intend to use.

Once you have your piece cut out, sand the front surface smooth (this is particularly important, because your painting will look rather odd if the surface is not fairly smooth.) You may choose to remove the ring of bark around the outside of your piece, or leave it in place, whichever seems more appealing to you. Also, be sure the thickness of your piece is uniform, as any slant will cause it to hang poorly when put up on a wall.

Craft ideas

Craft making as one of the best ways of giving gifts while being intimate and personal in all special occasions.

There are many ways your family can have quality time with each other. One of the great ways is craft making. It may be simple or may involve delicate, specific and articulate designs but all

the members of the family may be involved in all the exciting steps of craft making starting from planning to designing. This is a sure way of having fun while doing something for special occasions or just for quiet times with your loved ones.

Every special occasion means giving something, which will symbolize your love and appreciation to someone. Craft making involves personal touch and ideas thus, it will be more intimate and sensitive because it is made specifically for that special person. The relationship you have with each other may reflect with what you have done. Craft making can eat an hour, your whole day, weeks or even months depending on your plan and how you would like it to be made. This will also depend in the personality, age, and the willingness of how much time and effort the person doing craft will put into.

Magazines and websites will be of great help in choosing what you would like to make and finding the right supplies. You can either ask your friends of what is the best design to make or you may also buy things from the store and then put designs with your personal touch. You may also buy craft supplies you need for craft making and find outside assistance with certain steps.

Now that Mother’s Day is fast approaching, what will be the best thing to give the woman who we owe our lives to? You can buy expensive or cheap stuff in stores or personally make that special gift for your mom. We should be reminded that the day is not only for the mothers but also for the children. From the traditional cards saying love and poems, we can choose from other ideas and designs made into lovely gifts which require a little time and effort. For younger kids who really want to give something special for their mommies, they would need assistance and might end-up being a helper to the older ones.

You can choose from customized pillowcases, personalized clock or other ideas. In doing customized pillow cases, these crafts can be made easily with a simple stitching pattern guide. If you want you can put heart warming messages or designs such as hearts and flowers of your choice in embroidering them. In doing personalized clock, buy a simple analog clock. You may pop the cover off the front and remove the hands. Place a special photograph of your mom or other art design on the front, gluing it into place. Replace the hands and front cover, and its ready! Always remember to remove the battery of the clock before removing the hands; but before removing the hands, it is a good idea to synchronize them to a single position first. This is to make sure that the clock is still working after being reassembled.

Paper crafts

Maybe one of simple ideas is to put out the bunch of edifice paper, glue, sparkle, scissors, etc and let your kids thoughts run wild. For the younger children, the pre-cut range of shapes out of paper. For the older children, allow them do on their personal. For the more creative plan, use the three boxes. In first box, put the bunch of diverse paper shapes. In second box, put the scraps of the fabric, ribbons, or else bows. In last box, put little objects like the seashells from the beach trip, buttons, or else the photos of the family members or else pets. Have child pick one item from the each box, as well as try to incorporate items into the story on paper.

Seasonal crafts are for all time the big hit, as well as there are loads of you can create using only the paper and some embellishments. The Valentine’s Day is the ordinary holiday for this. Kids can make the valentine cards for friends by the cutting heart out of the red, pink, or else the white paper. They can also use the glue glitter, the ribbon, the lace, or else the other decorations to hearts that they make. In adding up, loads of school-age kids make the mailboxes out of the construction paper or else the heavier paper, like the cardstock. This way they contain a bit to hold all of their associates’ valentines!

One more season that the begs for the paper crafts is Thanksgiving. From the table centerpieces to the place markers, there are lots of different things your kids can do to formulate your gathering more celebratory. For preschool-age kids, one popular as well as simple craft is building turkeys from the handprint. First, trace child’s hand on the piece of structure paper plus cut it out - with help if needed. Then, they be able to paste pre-cut feathers complete of building paper, or actual craft the feathers if you contain some lying around, the finger part. Make use of markers, the crayons, or additional paper to add the legs as well as facial features. Now you have the personalized turkey!

Origami is, the most accepted form of the paper craft. Although generally thought of a more adult craft, there are countless that kids can do. The simple search from your library or else Internet can consequence in quite a few ideas for kids. You can print out the free patterns on lots of websites. Just be sure that craft is suitable for child’s age level to make sure that everybody will have fun.

Beading designs

Beads have become part of our lives, and these are used in various things such as the jewelry that we wear, or on other decorative things in our homes such as table mats, bed covers etc. The greatest part of using beads, is that you can get creative and create your own beading designs

and decorate different things that you use. You can decorate a hand bag with beads, and thus making it really attractive. When you work with beading, you need to have patience, time and creativity. If your doing beading in a professional capacity, you need to be precise, so that your beading designs look neat and intricate.

If you've understood the simple basics of beading, you can work on varied beading designs, be it simple designs or more complex such as Peyote designs. Geometric and floral patterns are simple beading designs. Creating, animals or huge table cloths, is a lot more complex.

Majority of bead work is done with thread. However you can get innovative and use different materials with beads. Wires have become increasingly popular, mainly because its so easy and flexible to work with. Attractive hair pins and clips, with bead work is done using metal strips. To do this, you need to bend the metal as by doing this the beads don't fall out. Create a loop by attaching the two ends of metal. You can use aluminum strips, which are extremely thin and workable to create dangle bead earrings. If you stick both ends of the strips by folding one on top of the other, you can make beautiful pendants.

Beads made of glass or wood, or transparent plastic can be used to make bracelets. Bright colors make jewelry more attractive. You can also use large beads to make a chunky bracelets which are quite popular with teenagers. It's actually very simple to make a bracelet. Just thread some beads together, add a hook at the two ends of the threads, and you have an attractive bead bracelet. Using rubber instead of thread is also something unique and creative. However one thing that you need to be mindful of, is taking care not to stretch the rubber while your putting in the beads. Only when your wearing the bracelet, can the rubber be stretched. It's advisable to make a rubber bracelet by using the rubber that fits the size of your wrist.

Card making

Hello card makers around the world. How long have you been making cards? Do you think you can stop? I can't.

I started making cards 5 years ago and have not stopped since, the bug has gripped me to the

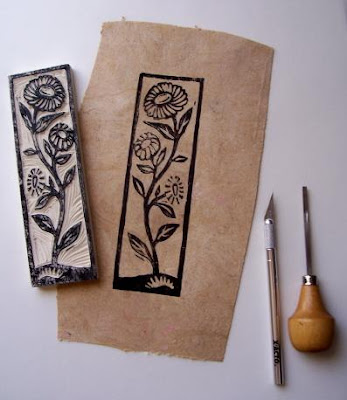
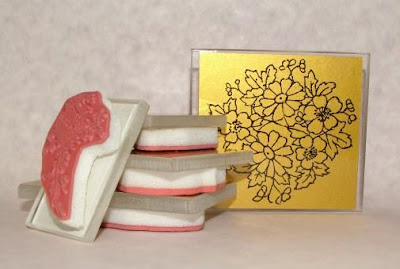
point that I have now set up a mail order and internet company selling good quality card making supplies to all the other addicted card makers out there. We have over 200 different die cut shapes which I cut to order so my customers get good quality in the colour of their choice.

I find it so satisfying to make a card which is unique and special for a special person at a fraction of the cost it would be to buy one.

I usually start with a sheet of A5 and score it before folding in half, then I add a layer made from either a card shape or strip of ribbon, this is then topped with a small embellishment from my huge collection and finally a couple of peel offs to add some shine. Then I find an envelope in a matching colour and get great pleasure from giving my cards to friends and family.

It is always best to choose a colour scheme and use items which fit within your scheme a colour coordinated card looks much nicer than an ecclectic mixture of bits.

I always find that the less you put on a card the better it looks.

I use die cut shapes with added embellishments to make beautiful cards for all my family and friends. I don't sell my cards as they are specially for me, but I do sell over 200 differnt die cut shapes in a wide variety of themes as well as peel offs and other card making goodies. Why not visit our new web site and let us know what you think of our products, prices and web design.

Craft kits

Making crafts can be fun. There are many kits available to make this an enjoyable activity for everyone.

Making crafts is not as simple as 1, 2 and 3. It needs some diligence combined with fun. One can make a simple craft or a sophisticated one. This is one great bonding activity to spend with the

whole family, especially with children. This is also another way to make your leisure time more useful and productive. The products created can be used as a gift for loved ones, or serve as decorations in your house. Other people are always appreciative of handmade works, especially when receiving them as presents.

Making crafts are a great way to show affection. Many people like crafts as a gift because they value the efforts of the creator. They know that the gift given crafts are made especially for them rather than the gifts that are being bought from store. The end product is a symbol of one’s ingenuity, creativity, hardwork, and dedication poured into making it as perfect as possible.

Crafts are not just for kids, it is for everybody. Kids are given simpler works to follow. But adults could do more complex designs and works. It is a good way to pass the time and improve their hand skills.

Crafts come in many designs and styles. It is best that you have the complete materials when doing crafts. It will make your project easier, and allow you to be more organized.

Here are some of the kits used when doing crafts.

Glass Jewelry Kit

Women are most especially fond of wearing jewelries made of beads, pearls or other materials. These items accessorize their clothes and make them feel more beautiful and chic. But there are times that they find these jewelries too common to use. They thought that they have already used the jewelries too often. Others just throw or give these jewelries away.

A better idea would be to recycle and reuse these accessories. If you are tired of the item, you could dismantle the materials, mix and match the bead them to form a new bracelet, necklace or earrings.

Other craft jewelries are made of fused or warm glass. And these come in several useful kits. A typical glass kit has the following contents: clear colored glass sheets, assorted colors of glass stringers, assorted colors of glass noodles, assorted colors of glass mosaic chunks, high temperature wire, cutting fluid, glass cutter, kiln wash, running pliers, and an instruction sheet.

Craft supplies

When times get tough our hobbies are generally first to suffer the cutbacks. The list below has just a few ideas to help you save money on craft supplies and you may also find yourself a new creative burst by trying them. Crafts don’t always have to be so expensive and it is fun to improvise.

Paper and card

Newspaper offcuts: A great place to get plain paper, particularly for kids crafts and drawing is a newspaper office. Our local newspaper has always had huge rolls of plain white paper available for around $10 - $15, that is a roll that is over a metre wide and 30cm in diameter. I believe it was over 100 metres of paper, well my daughter has had the same roll for over 5 years. It isn’t great quality but it has tons of uses like as a drop sheet for other projects, making patterns for sewing.

Scrapbooking paper and card: If you are finding the scrapbook stores too expensive try looking in newsagents, office supply stores and department stores for paper and card. They may not have the same range and quality but you may find something to help your supply of better paper last longer.

Op shops and flea markets

Fabric and wool: Second hand clothes found in opportunity shops and flea markets can often be a great source of fabric when you don’t need large amounts. Even when clothes are fairly old there are generally parts that are not faded or worn.

Craft paper

How would you like to put some extra cash in your pockets? Why not make paper flowers and sell them at craft shows and flee markets. Creating beautiful paper blossoms and making them into home decorations or other uses may be a perfect way to do just that.

You could sell just a single flower, make bouquets, centerpieces, swags, or a simple corsage. Paper flowers have many uses, they can be used for decorating your home as in centerpieces, swags, curtain tiebacks, or just put a couple in a small vase and add a little scent to make the bathroom smell really good, this is just a sample of how they can be used for your home. They can also make a wedding day very special with the beautiful bouquets, corsages, boutonnières, and decorations for the church and reception hall.

There are several different types of paper that can be used to make these flowers; crepe paper, tissue paper, and mulberry paper are a few. Most of the papers are inexpensive and the flowers usually do not require a very large amount of the paper for each flower.

How to make paper flowers is an exciting and rewarding hobby. You can make a simple flower or go to a little more work and make realistic paper flowers that people cannot tell the difference between the real ones and the paper ones. They would have to feel them or smell them to tell which is which.

The price that you charge for making your paper flowers is up to you. How much is your time and talent worth? The cost of the materials for this hobby is very inexpensive, as it only takes paper, wire, glue, scissors, wire cutters, and patterns.

If you want you can make the crepe paper flowers have a smell simply spray a little bit of a floral scented perfume or add a few drops of scented oil this will give them a more life like scent

You also can give them a shiny look by spraying them with a spray gloss that is used for paper and other projects, people have told use it really sets them apart from other paper flowers.

Craft embellishments

From decorating a pillow to wrapping up a present, silk ribbon embroidery is extremely beautiful and easy to play with for hand-made projects. Ribbons are widely used to help people decorate or tie up creatively almost any type of hand-made project. But using ribbons to create for example a pompon bow or a ribbon rose used as a garment pin, takes practice and professional advice. Thus, the following simple tips can help you embellish your friend's next present, or surprise your dinner guests with your own ribbon-made Dior plate treatments.

To create any kind of bow, you will need some basic tools, such as scissors, a meter, a thin wooden stick, some glue tape and/or wire and of course your choice of ribbons. Sold in a variety of colors, designs and textures, you can find your selection of ribbons at your local fabric store. If you wish to make your own pompon bow, take a ribbon and form a 9 inches loop equal in size to the diameter of the finished bow. Wrap the remaining ribbon around the loop as many times as you desire for your bow. Then, flatten loops and cut off triangles at end, being careful not to cut too close to the center. By bringing ends together to meet in center you will then be left with two

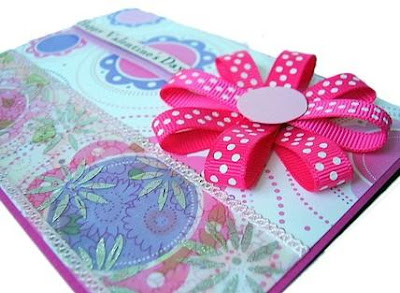
overlapping triangles. Secure the ribbon at the centered triangles with wire, tape or another piece of ribbon. Pull out loops, twisting them towards the center and alternating sides and you will end up with your pompon bow. In case a Dior bow seems more appropriate, cut your selection of ribbon or ribbons into 5 lengths, beginning with 5 inches and stopping at 22 inches. Then take each piece and form loops, overlapping at the center. Glue them in place, and then securely attach each loop with the next. Finally, wrap a smaller length around the center of your bow and glue it under the bow's visible surface. Your Dior bow can now embellish your hat, shoes, or handbag.

If you want to create your own beautiful ribbon pin rose you will need some wire and your choice of ribbons for the rose and its petals. Begin by making a knot at one end of a 22 inches ribbon length. At the opposite end of the ribbon, poke out wire from one side and loosely gather the ribbon along this wire down to the knot. Avoid pulling the ribbon hard, as it might snap. Continue gathering until the entire side is completely ruffled and it seems to curl naturally. Do not cut off the wire that appears at the end; leave for now free. Then, start forming a rose, by holding the knotted end in one hand and spiral the wired gathered ribbon with the other around the knot loosely. Continue rapping until it flares out and acquires an open rose effect. Then, fold the raw edge down to meet the gathered one and secure the wrapping wire end around the knot tightly.

Wood craft designs


A router table is defined by the bits that are used. It really does all revolve around the bits! Router tables create some of the most beautiful, impressive shapes to a plain piece of wood. They have been a staple to the professional woodworker’s shop for a long time and are quickly finding their way into the garage of the handy-man also. With more people interested in adding unique touches of trims and moldings to their furnishings and homes, they are finding that they can add these touches themselves by learning how to put a router table to use and guide the wood through a router.

You may think that creating beveled edges and shaped cornices is difficult, but the router saws actually do the work. If you can guide a piece of planking through a table saw, then you will have no problem learning how to use a router table, regardless of whether you are using homemade router tables or high-quality Wolfcraft router tables.

Router table plans are available and can help bring the learning curve down as well. Some plans are even available free online. Plans show what shapes can develop from the use of different bits, angles and motions. Router table plans are not meant to show only the shape the bit will produce. Showing the shape is just the basic capabilities of the bit. Add with this the imagination of a craftsman and there are unlimited design opportunities. These plans also show how adjusting and angling the wood with each pass through the router can create its own unique look, or the identical pattern you want to use.

Bits are the central force behind the capabilities of a router table. The bit determines the notching and edging patterns. Some edge bits create the beveling on mantle pieces or straight and rabetting bits for when you want to cut deep, square notches. Dovetail bits create the snug fit found in the higher quality drawer construction. Slot cutters and finger joint bits help keep cabinet fronts snug inside the edge frames. Specialty bits can be used for a variety of projects.

Craft room designs


The first step in designing your billiard room is figuring out how much space you’ll need. An adult or regulation size pool table is 9 feet long, and a smaller, child’s table will be about 7 feet long. Tables are also made in all sizes in between, so if space is an issue for you, you should be able to

find one around 8 feet. You should also consider how much room the shooter will need. A good idea is to give an adult shooter 4-6 feet of space around the table, and 3-5 feet for children. Once you have an idea of the size of your billiard table, you can pick one out. If you plan on keeping your table for a long time, the best idea is to buy one with a solid wood frame, and solid wood sub-rails. You should also take note of the “live gum rubber” percentage of the rail cushion. A higher percentage is equivalent to better quality.
Decorating

The next step in designing your billiard room is decorating. A popular first step in decorating is billiard lamps. Billiard lamps come in all shapes and colors, so you shouldn’t have a problem finding one that is suitable to your tastes, and the color scheme of your billiard room. Billiard lamps are fairly easy to install yourself, but you may need some small tools such as a screwdriver or pliers. An old-fashioned juke box is a popular alternative to a big stereo system; however, the popular trend is for music to be played in the form of mp3s. A stereo with mp3 capabilities is probably a good investment, if music in your billiard room is important to you. Surround sound speakers are another popular choice for billiard rooms, as

they aren’t too expensive and can be installed simply with the use of an instruction manual. Popular wall hangings for billiard rooms can be found at any home decorating store and at online billiards stores. You will also need a place to put your pool cues when they are not in use.